5 Navigation part 2
We can use a range of strategies to find our way around on the water.

These range from the simple - like noticing when you pass major landmarks, to the complex - like calculating times and compass bearings that get you where you want to go when the tide is flowing. We prefer to use simple strategies wherever possible - there’s less mental energy required and less to go wrong. However, in more complex situations, or when fewer landmarks are available, we may need to use more complex strategies. Ranging from the simplest to the more complex, we’ll look at:
Handrailing / ticking features - paddling along a coastline and noticing what things we’ve passed
Following compass bearings - when we leave the coast, this enables us to head in a set direction
Dead reckoning - measuring how long we’ve paddled for (often along a compass bearing) and using our estimated speed to calculate how far we’ve come
Dead reckoning and planning in tidal waters, when we have to factor tidal streams into our estimates
Wherever possible, we should seek to use simpler approaches. For example, we might use complicated techniques to plan a crossing in tidal waters, but use a series of compass bearings to check where we actually are part way across. Even better, we might line up some features and follow the alignment, so that we’re effectively handrailing, despite being in open water.
Let’s look at each of these techniques in more detail.
5.1 Coastal pilotage - handrailing
Pilotage is the art of finding your way around within sight of land, using visual references. It is considered distinct from ‘Navigation’ (with a capital N!), which often refers to finding ones way away from land, or without good visual references. Most sea kayak navigation is really pilotage - making the most of the things that we can see.
The simplest approach to coastal navigation is simply to follow a linear feature (like a coastline) and know how far along this we are by the things that we have passed.
What landmarks would we expect to see on a paddle from Portloo to Old Town?
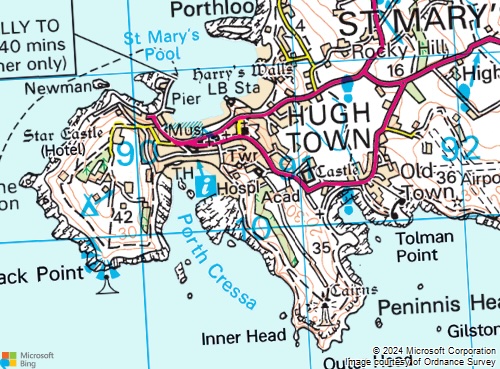
Paddling out of Portloo, turn left around a rocky area (island at HW). Pass a small beach, a rocky promontory, a second beach and a lifeboat station. Paddle past the town beach and round the pier. Pass a small island, turning left. Pass a point and turn left again. Left again at a point with a beacon offshore. Sharp left inside some islands into a beach with buildings behind. Back out of this bay, past an indent (island) to a major headland (lighthouse). Round the headland, offshore island, smaller headland and into Old town bay (look for main road and the town).
Of course, a similar approach might be used by a group paddling inland following a river.
5.1.1 Compass use for coastal pilotage
Many kayakers see their steering compass mainly as a tool to be used for open crossings. In fact, they can be very useful when following coastlines. A kayak following the coast often points in the direction of the coastline, so glancing at the compass tells you which direction the coastline is running in. Keeping an eye on this is a good habit to get into:
You can easily spot places where the coastline changes direction - at a corner or headland.
If the coastline follows a gradual curve, you can estimate how far around the curve you are.
5.2 The compass and bearings
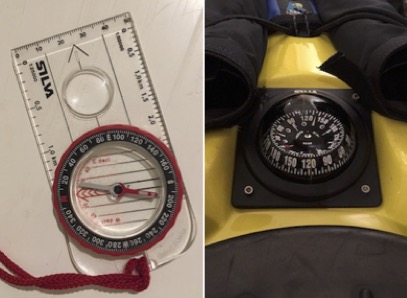
Compasses are useful as they allow us to set direction on the water relative to (magnetic) north. Two types are commonly used in a sea kayak:
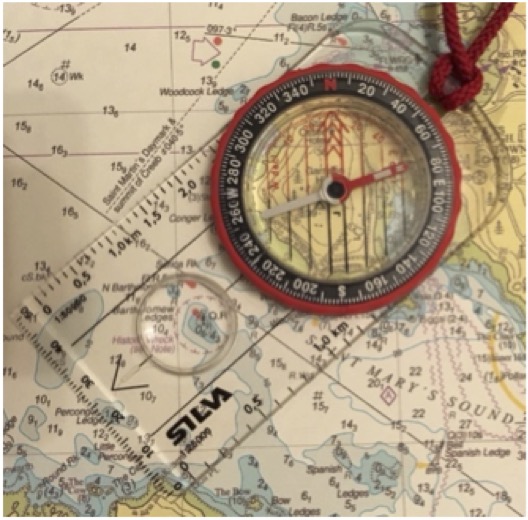
- A hiking (baseplate) compass is used for measuring bearings on charts and taking bearings of objects from the cockpit. It’s worth getting a decent one - I bought a few cheap for teaching courses and they’re terrible, with the needle often sticking in place rather than pointing north. Silva and Suunto are reputable brands.
- A steering compass is mounted to the front deck of a sea kayak. It is used to determine the direction that the boat is pointing. The Silva 70P is used almost universally for this purpose. Some paddlers use a compass attached to the decklines with elastics like the Silva 58 Kayak.
The simplest way to use a compass is to align a map by aligning the north-going lines on the map with the compass needle (ensuring the red end of the needle points towards the top of the map). Setting a map in this way often helps with orientation.
One use of a compass is simply as a protractor to measure bearings on a chart. To do this:
- Align the side of the compass along the bearing that you wish to measure. Check that the arrow on the compass base plate points along the bearing direction.
- Rotate the bezel of the compass to align the lines inside the bezel with north-pointing grid lines on the map
- Read off the bearing at the fiducial mark (black line) at the edge of the bezel scale.
What is the bearing of Gull point from Wras island?
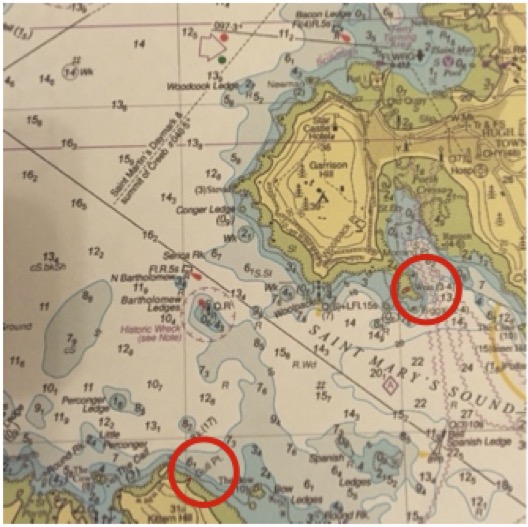
Place one edge of the compass along the bearing to be measured – here the lower edge of the compass is aligned between Wras island and Gull Pt.
Check that the arrow on the base plate points in the right direction – here we are measuring a bearing from Wras to Gull Pt., so the arrow is pointing in the correct direction – towards Gull Pt:
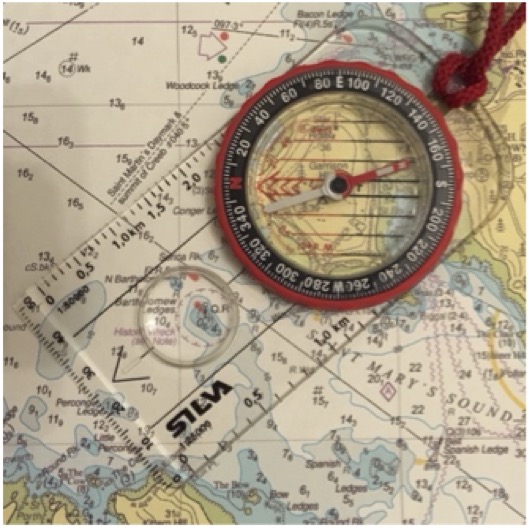
Twist the Bezel until the red lines inside it align with the north-going grid lines on the map.
Read off the bearing from the mark on the edge of the bezel. Here it is 230˚
Grid lines on maps and charts do not point exactly towards the magnetic north that a compass needle aligns with. However, the difference is currently very small in the UK - so if you’re based in the UK and new to compass use, you might want to ignore the info below on magnetic variation.
Magnetic variation Unfortunately, the grid lines on maps and charts do not point towards the magnetic north that a compass needle aligns with. This is because the location of the magnetic north pole is not in the same position as the north pole used as a datum for grid systems. The difference between the map’s grid north and the magnetic north that the compass points to is called magnetic variation. It varies from place to place and from year to year. Magnetic variation is shown on maps and charts.
Magnetic variation in the UK is very small – generally 3˚ or less. This is a greater than the level of accuracy that can really be achieved on a kayak deck. As such, corrections for variations can be ignored for many practical purposes.
To convert from bearings taken from the map to magnetic bearings, westerly variation (typical in UK) is added to the bearing. A subtraction is required to go from magnetic bearings to true (map) bearings. However, it’s worth noting that some areas of the UK now have easterly variation on OS maps.
What is the bearing of Gull point from Wras island with reference to magnetic north?
We measured the bearing as 230˚T (T=with reference to true north).
On the chart we find a compass rose that indicates magnetic north. It reads: 3˚00’W 2015 (9’E):
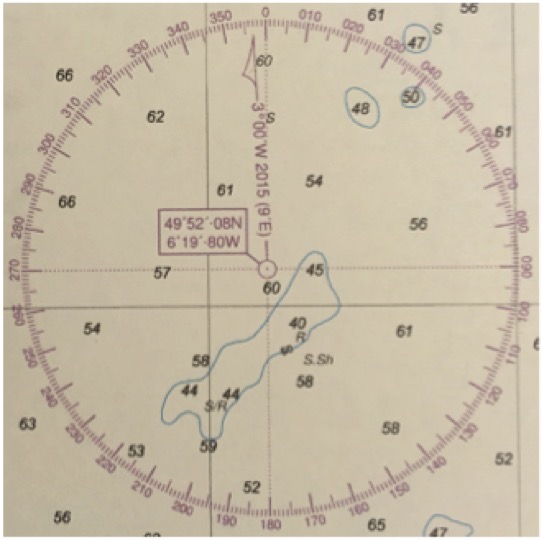
This means that magnetic north was 3˚W of grid north in 2015, and is moving east (i.e. variation is decreasing) by 9’ a year.
It is now 2017, so variation will be 2˚42’W. Let’s take it as 3˚ at a reasonable level of accuracy.
Being westerly variation, this must be added to the bearing to give 233˚MN (magnetic).
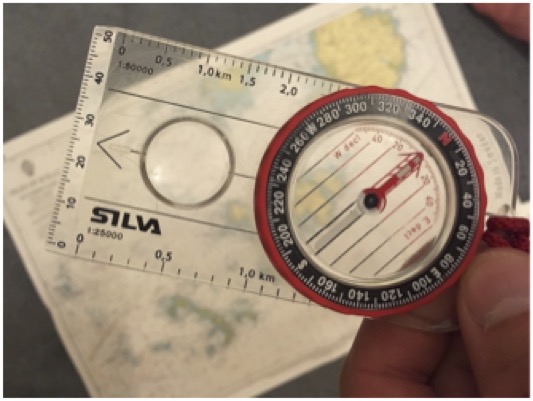
Once a compass has been set to a bearing as described above it can be picked up off the map and rotated until the red north needle aligns with the red arrow within the bezel.
The arrow on the compass base plate now points along the bearing that we have set the compass bezel to.
The process above can be reversed to transfer a bearing measured across the water to a chart. For example, if you want to know which lighthouse you’re looking at:
- Point the compass base plate arrow at the lighthouse
- Twist the bezel until the red part of the needle aligns with the red arrow
- Place the compass on the map, with the red lines within the bezel aligned with the north-going grid lines
- Place the edge of the compass on your current position
- The lighthouse should appear on the chart somewhere along the same edge of the compass.
5.3 Dead reckoning
If we know how fast we’re paddling, and how long we’ve been paddling since we passed a particular point, we can calculate how far from that point we are. If we also know what direction we’re paddling in (e.g. by following the coast, or by paddling on a bearing), then we can estimate where we are. This process is known as ‘dead reckoning’. It should be done with caution, as it ignores the effect of wind and taking tide into account can be tricky.
Having said that, it’s good practice to get in the habit of estimating how long it’s going to take to get to the next point, as this is a great backup to navigating by ticking features.
5.4 Navigation tricks
Here’s a few simple principles to make navigation a little easier. They’re handy whenever you’re on the water, but they become invaluable if you’re trying to find your way in fog or at night.
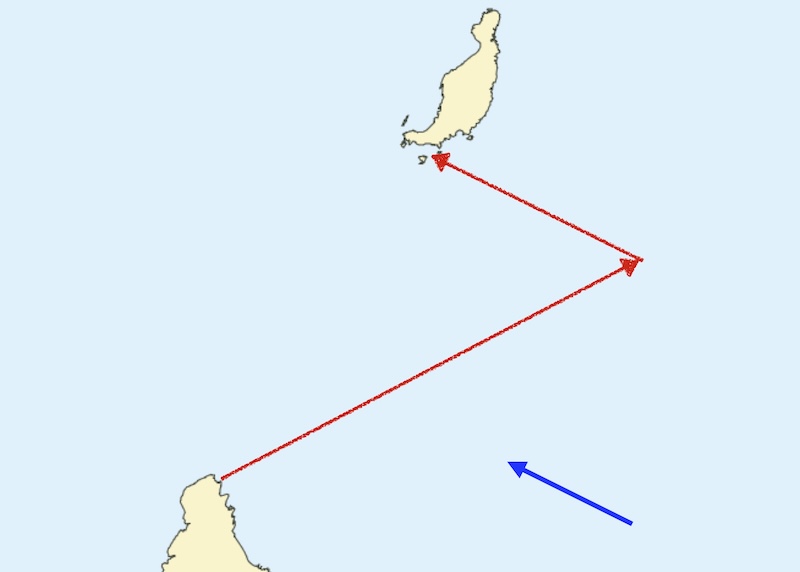
5.4.1 Short legs
Keep each hop between identifiable features short - avoid long sections during which you can’t check your navigation.
5.4.2 Aiming off
If you take a bearing towards an object (e.g. a place on distant shoreline), it’s very unlikely that you’ll end up exactly where you planned. When you arrive at the shore and don’t immediately find the thing you’re looking for, it’s not clear what to do next - do you turn left or right? To avoid this problem, deliberately aim to one side of the feature - that way you’ll know which way to turn.
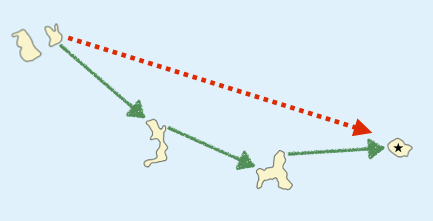
5.4.3 Attack points
Heading a significant distance towards a small feature isn’t likely to be successful. A better plan is to locate an easy to find feature nearby, then head from here towards your smaller feature. If you don’t succeed on the first go, you can return to your large, prominent feature and try again.
Map diagrams based on Holmes, Ian. (2017). Mean High Water Springs Polygon, [Dataset]. University of Edinburgh. https://doi.org/10.7488/ds/1969, public sector information licensed under the Open Government Licence v3.0
5.5 Navigation for short crossings
We learnt in the tides module how to determine which way a tidal stream will be running and how to estimate how quickly it will be running. Together with the pilotage techniques covered elsewhere, this is generally sufficient knowledge to kayak in tidal waters. However, if more ambitious crossings are being contemplated, it is helpful to be able to carry out formal navigation to determine what course to steer and how long the crossing will take.
Imagine a paddler capable of 3 knots paddling speed attempts to paddle across a 1-mile wide tidal strait running at 1.5 knots to the south. If the paddler takes a bearing to a point on the far side and paddles on this bearing, they will not get to where they expect. During the 20-minute crossing, they will drift 0.5 miles southward.
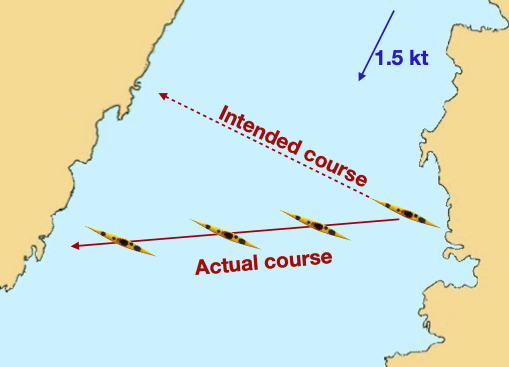
The solution is to angle the boat up tide enough to cancel out the southerly drift. It’s the same principle as a ferry glide on a river, just over a longer distance.
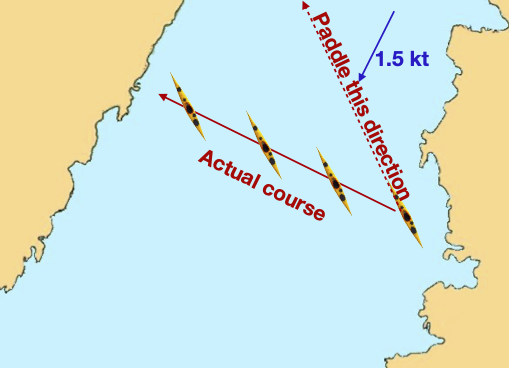
It’s clear that we will need to alter the course that we steer in tidal waters. The question is how much, and how long will a crossing take given the influence of the tide?
5.5.1 Simple tactics
In many situations, we can greatly simplify tidal crossings by:
Choosing to cross around the time of slack water
Using visual pilotage, especially transits, to set the angle of the boat
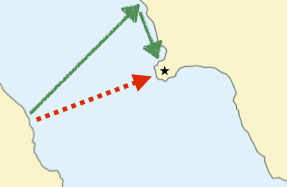
What’s the simplest approach to planning a crossing from Tofts Ness on Sanday to North Ronaldsay?
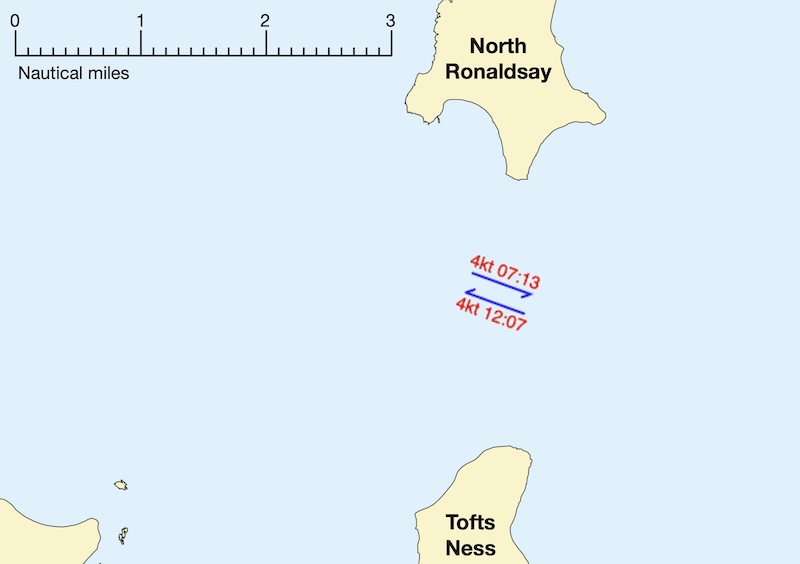
Slack water is expected to occur at 12:07. The crossing is about 2 nautical miles, so it will take us around 40 minutes to complete if we paddle at 3 knots. If we depart 20 minutes prior to slack water, the tidal flow will switch directions when we are halfway across. Any tidal drift to the east occurring during the first half of the crossing should be cancelled out by drift to the west during the second half.
Plan to depart 11:47, arrive 12:27 so that the tidal stream has zero net influence.
The Garvellachs are a group of islands off the west coast of Scotland, not far from Oban. Tidal streams run across the crossing out to the islands.
![]()
If we keep a point on the nearer island lined up with a point on the island behind, then we can be sure that we are proceeding on a straight line out to the islands.
5.5.2 Vectors
For the mathematically minded, calculating the course to steer is ‘simply’ a problem in vector addition to balance the effects of the tide with the paddling speed. For the rest of us, here’s a simple explanation followed by an example.
Let’s begin by considering a simpler problem. If we’re trying to paddle directly against the tide up a strait, what will happen? We’re paddling at 3 knots against a 1.5 knot tide. Most people will immediately work out that we’ll travel at 1.5 knots up tide and cover 1.5 nautical miles in an hour. But let’s take a more careful approach.
The trick we’re going to use is to avoid the complexity of the tidal flow and the paddling both happening at the same time, but instead pretending that they happen one after another. It’s as if we were playing a board game against the tide - the tide gets to make it’s move, then we get to make ours. So imagine that at 09:00, rather than paddle against the tide, we simply drift for an hour - let the tide make its move. We’d drift 1.5 knots down tide, as shown by the blue arrow in the diagram below:

We then make our ‘move’ and paddle up tide for an hour at 3 knots, as shown by the red arrow. We’d end up at the place indicated by the second boat at 10:00. In reality, of course, the paddling and the tidal flow happen at the same time, and we follow the green arrow, but assuming one thing happens at a time allows us to draw out what occurs carefully.
Let’s try this again when we’re paddling across the strait. Once again, if we do nothing for an hour, the tide will push us 1.5 nautical miles down the strait (blue arrow):
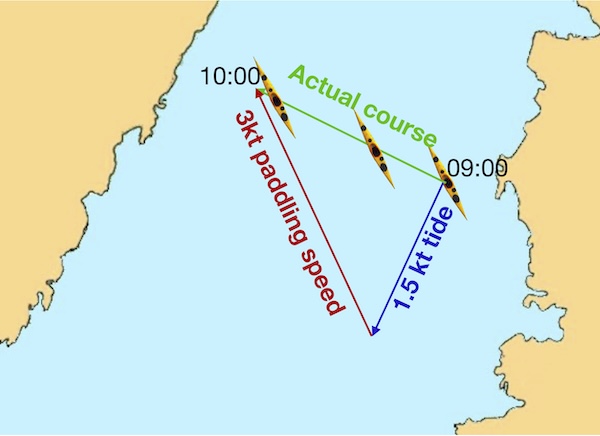
But this time we paddle at 3 knots not up the strait, but in a north-westerly direction (red arrow), ending up at the position of the second boat drawn at 10:00. And of course, in reality, we’ve carried out a ferry-glide along the green arrow.
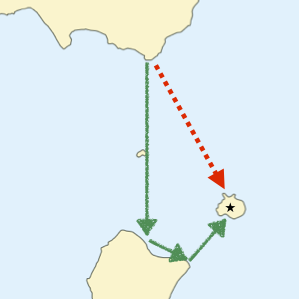
HW Mermaid Lagoon is 12:00 today. It’s a spring tide.
Starting at the landing at the eastern tip of Big Island, where will you end up if you paddle for 1 hour at 3 knots on bearing 170˚ starting 11:30?
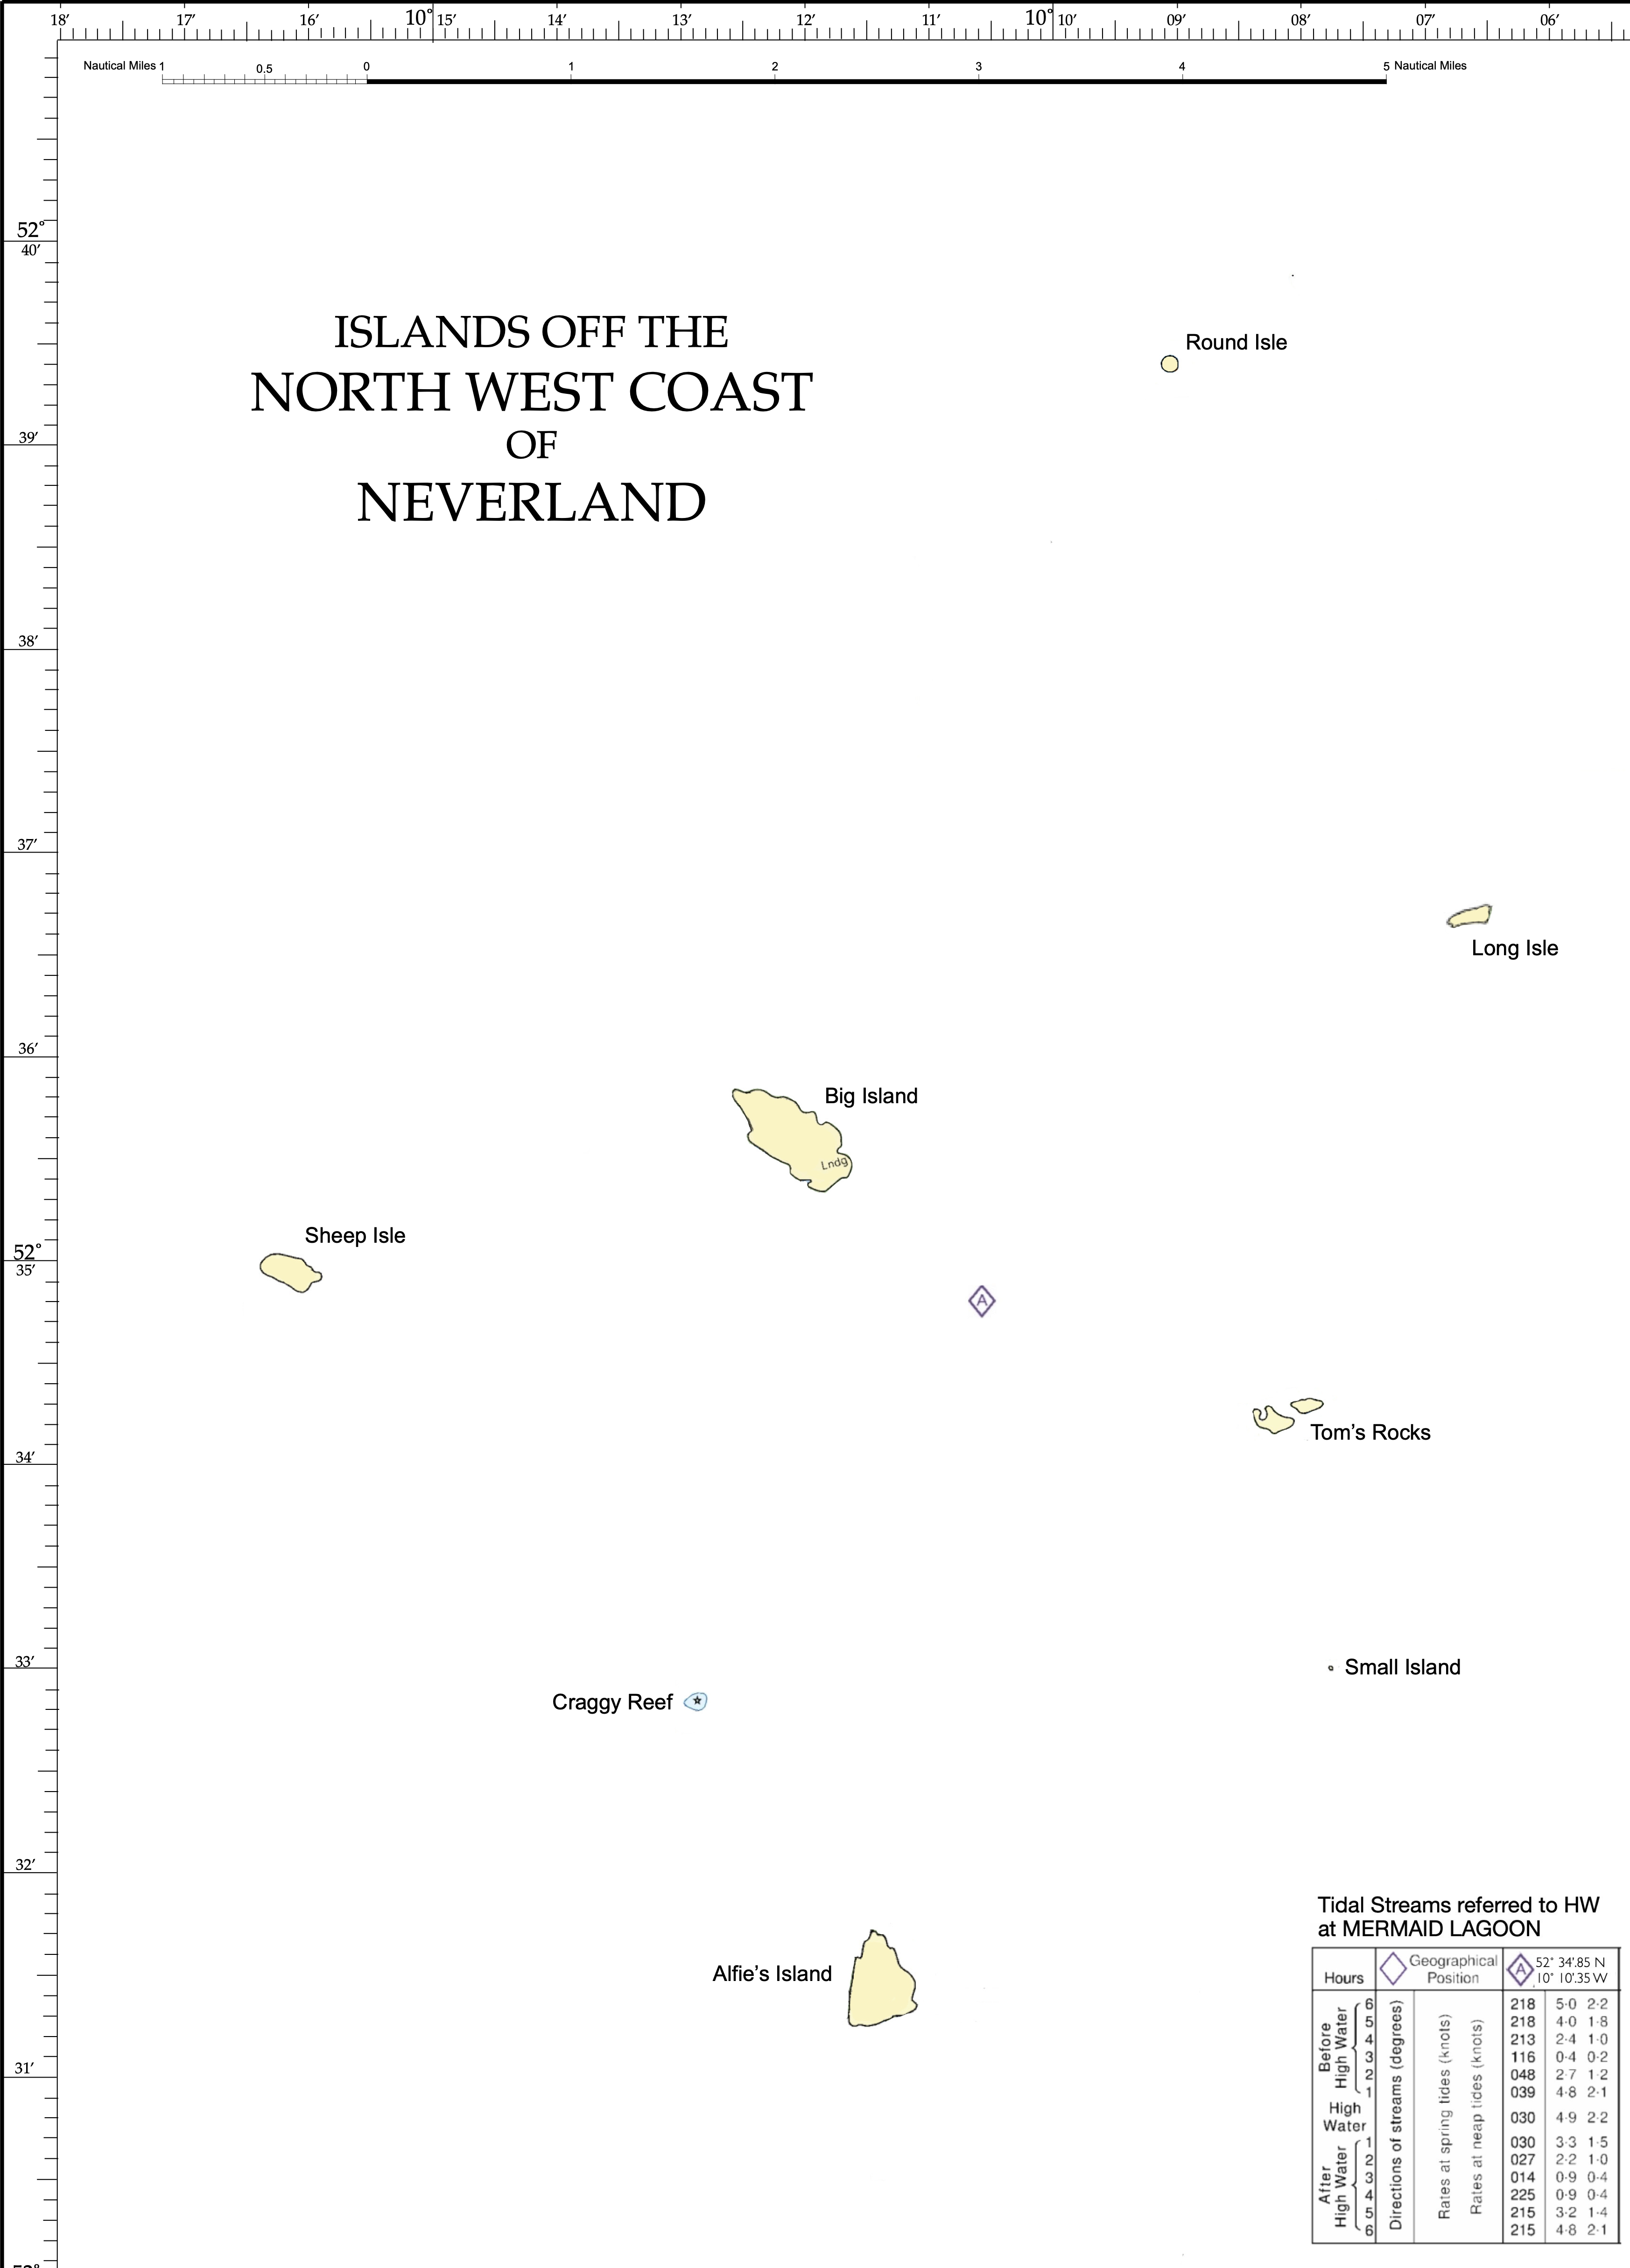
Assume that tidal streams across the charted area are similar to those indicated at tidal diamond ‘A’
If we depart at 11:30 and paddle for 1 hour, we will finish at 12:30. Take the tidal stream at 12:00 as representative of this period. HW Mermaid Lagoon is at 12:00, so we can find this tidal stream in the ‘High Water’ row of the tidal diamond table. It is a spring tide, so we expect the flow to be 4.9 knots at bearing 030˚.
Draw a line 4.9 miles long at 030˚ to represent the tidal drift - i.e. to the place that we would float to if we didn’t paddle for the hour (black line in image below).
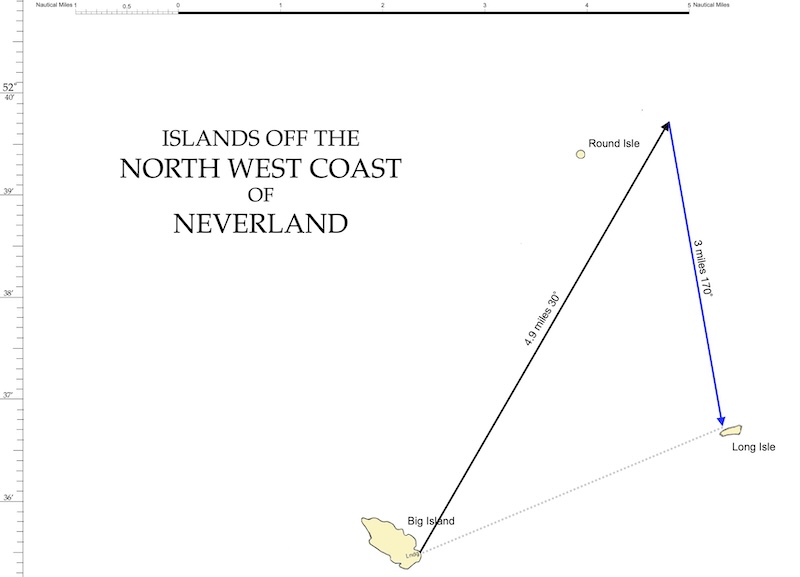
From the end of this line, draw a line 3 miles long at 100˚ (blue line in the image above) to represent 1 hour paddling at 3 knots.
We will end up at Long Isle. In reality, we’ll follow the grey dotted line on the image.
If you’ve printed the Neverland chart off, you might want to work out where you’ll end up if you paddle for 1 hour at 3 knots, starting at the landing on Big Island:
On bearing 090˚ starting 05:30
On bearing 180˚ starting 09:30
If you get these right, you’ll end up at islands, rather than in the middle of the sea!
5.5.3 Plotting course to steer
In the example, we seemed to end up hitting an island by chance, having picked a lucky direction to paddle in! But how might we use this approach to decide what direction we need to go?
Let’s draw out the blue arrow to show what the tide does once more, and add a line to indicate what direction we actually want to travel in:

Now, imagining that the tide and our paddling occur one after the other, what are the options for our ‘move’ if we’re going to paddle at 3 knots and cover 3 nautical miles? We can choose to cover those 3 miles in any direction from our position at the end of the blue arrow:
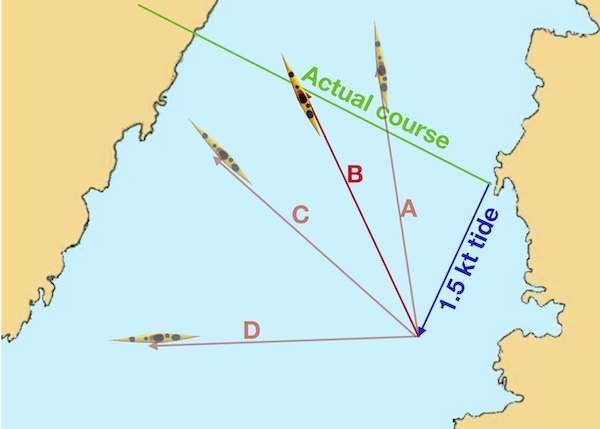
If we paddle west (D), we’ll end up way south of where we want to be. Paddling almost north (A) has us ending up too far north and up-tide. C is better, but still off our intended course. Clearly, direction B is ideal. All we’ve had to do is make sure the tip of the red arrow, which is 3 miles long to the chart scale, sits on the green line. Notice that the place we get to after an hour is still short of our destination on the far shore. That’s fine - as long as the tidal stream stays consistent, we can keep paddling in the same direction and we’ll arrive in a little over an hour.
The tips of all the red arrows that indicate our possible courses lie, of course, on a circle centered at the end of the blue arrow:
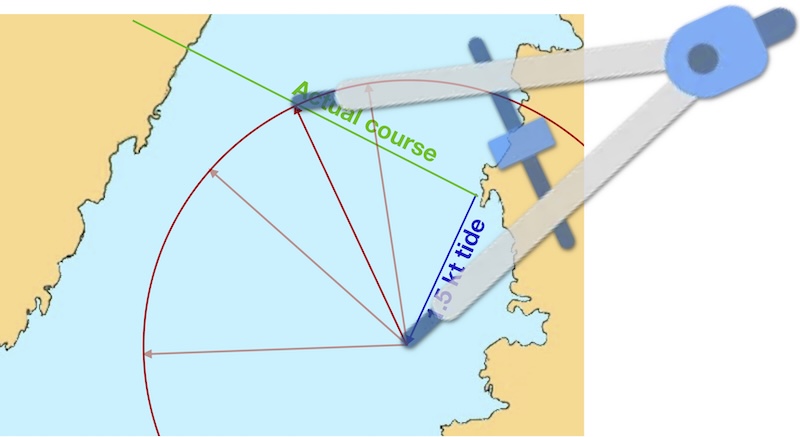
Where the circle crosses the green line is the point we want to draw our red paddling direction line to. So, we can use a pair of compasses set to 3 miles to find where this point is.
Let’s see how this works in a real example.
Estimate course to steer and time taken to cross Bardsey sound from Pen y Cil to the NE tip of Bardsey Island when a 2 knot tide is flowing NW. Your group is capable of paddling at 3 knots in still water.

First draw a line from start point to the destination and well beyond – the green line.
Then draw a line that represents the tidal flow in one hour. In this case, we are told the flow is 2 knots, so a 2-mile long line is needed. Recall that we can use the latitude scale to measure this. We assume that the tide flows in the direction indicated by the arrow on the chart. The blue line is 2 miles long and parallel to the arrow.
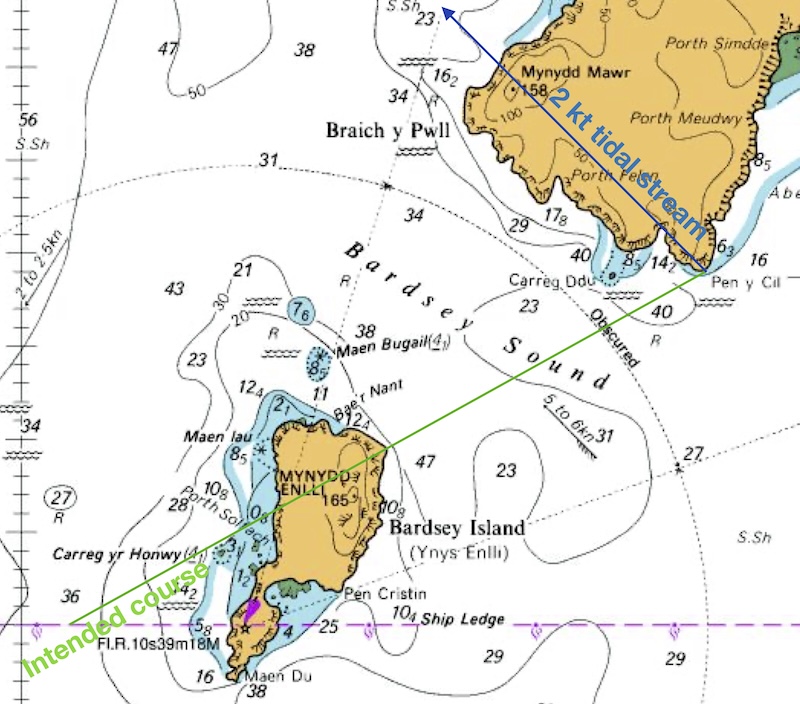
We then set our compass to the distance we intend to paddle in 1 hour - i.e. 3 nautical miles. We draw a circle (or part of a circle), centered on the end of the blue tidal stream arrow to indicate all the places that we could end up at the end of the hour:

There’s a place where this circle of possibilities crosses our intended course line - indicated with a yellow circle. This is where we should draw our 3 mile paddling arrow to:

The red line on the chart now indicates the direction that you should point the boat for a successful crossing. We can measure the angle of this line from north - it’s 200˚. This is the course to steer during the crossing. If we paddle from Pen y Cil at 200˚ at 3 knots, we expect to follow the green intended course line… and hence get to Bardsey successfully.
The distance along the green line from the blue line to the red line represents the distance that you would travel if you paddled across this tide for 1 hour – in this case 2.7 miles. It is clear here that it’s going to take less than one hour to get to Bardsey. The distance to Bardsey along the green line is 2 miles. So we expect the crossing to take 60 x 2/2.7 = 45 minutes.
The error often made in this process is drawing the paddling speed (red) line directly to the destination point. Instead, it must be of the correct length to represent 1 hour’s paddling distance and this will determine where it intersects the intended course (green) line.
The method shown here assumes that the tidal stream is constant through the period of the crossing. This is a reasonable assumption for crossings less than one hour. For longer crossings, we must consider the effect of tidal streams that very in strength and direction. These techniques are beyond the scope of this course.
5.5.4 Tactics for short crossings
If we’re sufficiently concerned about the crossing to have gone through the rigmarole of using vectors, it’s likely that the tidal stream is fairly strong. This may mean that there are some consequences to getting the crossing wrong. It would be useful to not rely entirely on blindly following the bearing that you’ve calculated.
5.5.4.1 Using landmarks
Wherever possible, you should make use of visible landmarks to check that you’re following the course that you want to. Remember that you’ll either need to take a bearing to a landmark, or (better) line two landmarks up to establish that you are following a known line. You might:
Use a transit, lining up two landmarks on the land that you are aiming for
Set up a transit using two landmarks on the land that you’ve just left - this has the disadvantages that you’ll need to keep looking behind you, and you’ll need to work out the alignment as you depart along your course
Check if you’re on a line between the place that you departed from and the place that you’re aiming for. A good way to do this is to use the paddle as a straight edge. Point the paddle towards one of the landmarks and bring one eye as close as you can to the paddle shaft, closing the other eye. Align the paddle to the landmark. Without moving the paddle, turn you head to bring the other eye down to look along the paddle shaft the other way. If you’re on the line you’ll see the shaft pointing to the other landmark.
Take a bearing towards the point that you’re heading towards and see if it remains constant
Take bearing back to your departure point and check that it remains as you’ve planned
5.5.4.2 Aiming uptide
If you’re heading to an offshore island, there is little leeway if things go wrong. For example, if you needed to deal with an incident halfway across the crossing, you might get swept downstream of the island and not be able to reach it.
Instead of aiming directly for the island, you might instead want to plan to end up some distance (perhaps half a mile or so) uptide of the island.
Once you end up in your planned position uptide of the island, you can turn to face the island, and paddle (or drift) to it with the tide.
Planning such a crossing is fairly straightforward. You know the direction of the tidal flow - e.g. from tidal diamond information - so you can easily plot a position half a mile from the island along the reciprocal bearing. You then simply do your vectors planning to that point.
On the water, the crossing will be easiest if your boat has a steering compass and you also have a baseplate compass in your buoyancy aid. Check that the compasses agree prior to starting the crossing - it’s too easy to pack a steel object too close to a steering compass! Use the steering compass to follow your planned bearing. Set the baseplate compass to the direction of the tidal stream. Periodically align the baseplate compass to north and check where it points. Once it points at the island, you are uptide and can turn to drift with the tidal stream.